


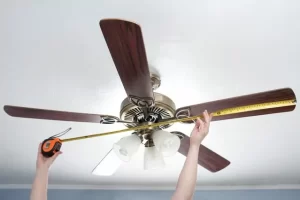
Cleaning a fan is an essential household chore to maintain air quality and ensure the longevity of the appliance. Over time, dust and debris accumulate on the fan blades, housing, and motor, which can reduce efficiency and potentially create health hazards.
Contents
My mom once showed me a very unique, easy and cost-effective method to clean a fan involves using a plastic bag. Its the that I feel its the best and easiest way to maintain the fans. In this post, let us discuss a detailed step-by-step guide on how to clean a fan with a plastic bag.
Steps to Clean a Fan with a Plastic Bag #Detailed Guide
One can easily clean a fan with a plastic bag without spreading much dust in the house. Following is the detailed step-by-step guide on cleaning a fan with plastic bag:
Materials and Tools Needed
Before you start cleaning your fan, gather the following materials and tools:
- Large Plastic Bag: A bag big enough to cover the fan blades will make the cleaning process more manageable and less messy.
- Dust Mask (optional): If you have allergies or are sensitive to dust, consider wearing a dust mask to protect yourself during the cleaning process.
- Soft Brush or Cloth: These will help remove dust from the fan housing and other parts without causing scratches or damage.
- Vacuum Cleaner (optional): A vacuum cleaner with a brush attachment can be helpful in removing excess dust and debris.
- Cleaning Solution: A mild soap and water mixture will work well for cleaning most fan parts.
- Screwdriver (if necessary): Some fans may require disassembly before cleaning, so have a screwdriver handy if needed.
Preparing the Fan for Cleaning
Before you begin the cleaning process, make sure to take the following precautions:
- Unplug the Fan: Always unplug the fan from the electrical outlet to avoid the risk of electric shock or injury.
- Move the Fan to a Well-Ventilated Area: Cleaning the fan can release dust and debris into the air, so choose a suitable location, preferably outdoors or in a well-ventilated room.
- Disassemble the Fan, if necessary: Some fans may require disassembly for thorough cleaning, however some fans might be cleaned without taking them apart. Consult your fan’s user manual for guidance on how to disassemble your specific model.
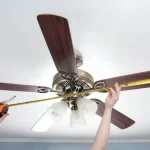
Cleaning the Fan Blades with a Plastic Bag
Once you have prepared the fan for cleaning, follow these steps to clean the fan blades using a plastic bag:
- Place the Plastic Bag around The Fan Blades: Open the plastic bag and carefully cover the fan blades, making sure the bag completely encloses them.
- Hold the Bag Tightly around the Base Of the Blades: Grasp the open end of the bag around the base of the blades to prevent dust and debris from escaping during the cleaning process.
- Gently Twist and Turn the Blades: Using your other hand, gently rotate the fan blades within the bag, allowing the dust to dislodge and collect within the bag. Be careful not to apply too much pressure or force, as this can damage the blades or motor.
- Repeat the Process for Each Blade: Continue to clean each fan blade using the plastic bag method until all blades are free of dust and debris.
Cleaning the Fan Housing and Other Parts
Now that the fan blades are clean, it’s time to focus on the fan housing, motor, and other components. Following are the steps to clean the fan housing and other parts:
- Use a Soft Brush or Cloth to Remove Dust: Gently brush or wipe away dust from the fan housing, motor, and any other accessible parts. Be cautious around the motor to avoid causing damage.
- Use a Vacuum Cleaner, if necessary: If there is a large amount of dust buildup, consider using a vacuum cleaner with a brush attachment to remove excess dust and debris. Be sure to avoid direct contact with the motor.
- Wipe Down the Fan Parts with a Cleaning Solution: Mix a mild soap and water solution and dampen a cloth or sponge. Wipe down the fan housing, grilles, and other parts, avoiding the motor area. Make sure not to soak any electrical components.
Reassembling and Testing the Fan
Once all the parts are clean, follow these steps to reassemble and test your fan:
Conclusion
Regular fan maintenance, including cleaning with a plastic bag, is crucial for maintaining optimal air quality and ensuring the longevity of your appliance. By following this simple and cost-effective method, you can keep your fan clean and efficient, improving both its performance and the air quality in your home.


Add Comment