

Ceiling fans are the popular household things that provide both comfort and aesthetic appeal to any room whether a bedroom or a big hall. Generally, ceiling fans are heavy-duty instruments that keep running for long durations; especially in the summer, fans are hardly switched off. They continuously work to keep us feel cool.
Because of that heavy-duty, many times, they either go slowed down or have some other issues, or for general maintenance, we have to take that down. Although most of us take down a ceiling fan with the help of an electrician. But, if you are someone who wants to do by yourself, this article is exactly what you would need to know how to safely take down a ceiling fan from the ceiling.
Whether you are a seasoned DIY enthusiast or a first-time homeowner, it is essential to approach this task with caution and follow safety guidelines. In this detailed guide, I will walk you through the step-by-step process of taking down a ceiling fan safely and efficiently.
Before You Begin Consider These:
Before you begin the process of removing the ceiling fan, there are a few preparatory steps you must take:
- Turn Off the Power: Safety should always be your top priority. Start by turning off the power supply to the ceiling fan from the main electrical panel so that you are 100% sure that there are no wires that have any current flow. Locate the circuit breaker corresponding to the fan and switch it off to avoid any electrical hazards while working.
- Gather the Required Tools: Ensure you have all the necessary tools for the job to minimize interruptions during the process. The tools you will need include:
-
- Screwdriver set
- Step ladder or sturdy platform
- Wire nuts
- Pliers
- Non-contact voltage tester
- Electrical tape
- Enlist a Helper : Ceiling fans can be heavy and cumbersome to handle alone. If possible, ask a family member or friend to assist you during the removal process. Having an extra pair of hands can make the task easier and safer.
Safety Considerations:
Electricity is a dangerous thing, thus when you are working with it, make sure that you are taking extra safety precautions. Here are a few things you can keep in consideration while taking down the fan:
- Use a Sturdy Ladder or Platform: Ensure your ladder or platform is stable and positioned on an even surface. Never use furniture or makeshift platforms to reach the ceiling fan as they can be unsafe and lead to accidents.
- Wear Safety Gear: Wear appropriate safety gear, including safety goggles and work gloves, to protect yourself from any debris or accidental wire touches.
- Test for Live Wires: Use a non-contact voltage tester to confirm that the power is off before touching any electrical connections. Do this at the wall switch and the fan’s electrical box.
Step-by-Step Guide:

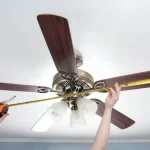
Remove the Fan Blades:
- Turn off the fan: Before starting the blade removal process, ensure the ceiling fan is turned off completely. Double-check by using the wall switch and pulling the fan’s chain to ensure it doesn’t start accidentally while you work on it.
- Choose the right screwdriver: Look at the screws that secure each blade to the motor housing. Ceiling fans typically use either Phillips or flat-head screws. Select the appropriate screwdriver for the task.
- Steady the blades: To prevent the blades from wobbling while you unscrew them, use one hand to hold the blade steady while using the other hand to turn the screws counterclockwise. Gradually remove each screw and keep them in a container or plastic bag to prevent losing them.
- Label the blades: If the fan blades are interchangeable, it’s a good idea to label them with their corresponding positions (e.g., “Blade 1,” “Blade 2,” etc.). This will make it easier to reassemble the fan later.

Detach the Light Fixture (If Applicable):

- Turn off the power: If the ceiling fan has an integrated light fixture, turn off the power supply to the light at the circuit breaker before proceeding. Confirm that the power is off using a non-contact voltage tester.
- Remove the light fixture: Depending on the design, the light fixture may be secured with screws or clips. Use a screwdriver to remove the screws or gently release the clips to detach the fixture from the fan’s housing.
- Disconnect the wiring: After removing the fixture, you’ll see wiring connections. Carefully detach the wires, taking note of their colors and positions. Use wire nuts to secure the exposed wires temporarily, and cover each connection with electrical tape for added safety.
- Cap the wires: If you don’t plan to replace the fan with another one immediately, cap the wires with wire nuts individually to prevent accidental contact and cover the entire wire bundle with electrical tape.
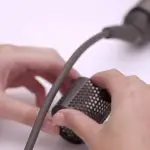
Disconnect the Fan Motor Wiring:
- Locate the electrical box: Climb the ladder or platform to access the electrical box on the ceiling. It is usually covered with a decorative plate or cap.
- Identify the wires: You’ll see wires coming from the fan motor and connecting to wires in the electrical box. There are typically three wires: black (hot), white (neutral), and green or bare (ground).
- Remove the wire nuts: Use your screwdriver to loosen and remove the wire nuts connecting the corresponding wires from the fan to the electrical box.
- Separate wires from screws (if needed): Some ceiling fans may have wires wrapped around screws instead of using wire nuts. In this case, use pliers to gently loosen the wires from the screws.
Support the Fan Motor:
- Enlist assistance (if possible): Given the weight of the fan motor, it is safer to have someone else hold the fan while you remove the mounting bracket.
- Steady the fan: While your helper supports the fan motor, use your free hand and the screwdriver to loosen and remove the screws securing the mounting bracket to the electrical box.
- Lower the fan gently: Once the mounting bracket is detached, carefully lower the fan motor and set it aside on a stable surface, ensuring it does not rest on the electrical wires.
Remove the Mounting Bracket:
- Unscrew the bracket: Use your screwdriver to remove any screws securing the mounting bracket to the electrical box. These screws might be on the sides or top of the bracket, depending on the fan’s design.
- Take out the bracket: Once the screws are removed, gently lift the mounting bracket out of the electrical box. Be cautious not to damage any wires or other components in the process.
Inspect the Electrical Box:
Examine the electrical box: Take a close look at the electrical box for any signs of damage, wear, or loose connections. If you notice any issues or suspect improper wiring, it is crucial to seek advice from a qualified electrician before proceeding with any new installations.
Cover the Wires:
- Reapply wire nuts: After successfully removing the ceiling fan and ensuring the exposed wires are disconnected, reapply wire nuts to each pair of wires (black to black, white to white, and green/bare to green/bare).
- Secure with electrical tape: Once the wire nuts are in place, wrap each connection securely with electrical tape. This helps to protect the connections from dust and accidental contact.
By following these detailed steps, you can safely and effectively take down a ceiling fan, allowing you to proceed with maintenance or prepare for a new installation without encountering any safety hazards or issues. Always prioritize safety throughout the process and seek professional assistance if needed.
Conclusion
If you approach it with the right tools and safety precautions, taking down a ceiling fan is a manageable DIY task. Always turn off the power supply before starting, wear appropriate safety gear, and enlist help. By following the step-by-step guide provided above, you can safely remove a ceiling fan and prepare the space for future maintenance or a new installation. Remember, if you encounter any electrical complications or are unsure about the process, it is best to seek assistance from a qualified electrician.


Add Comment